Selasa, 05 Juli 2011

All About Instalation Guide Rb750/G

Panduan ini ane khususkan buat agan-agan yang baru aja beli Rb750/750G buat warnet n game online, tp kesusahan dalam Instalation guidenya, dr mulai nyalainnya gimana, konekinnya gimana, buka winboxnya gimana, BM-nya bijimane dll.

Langkah2nya sbg berikut...
sebelum memulai langkah dibawah pastikan setingan ip adress pc agan obtain an ip address Automatically
1. Colokin adaptor ke listrik dan ujungnya ke Rb750

2. Colokan kabel lan dari modem ke Eth1

3. Colokan Kabel lan dari Eth2 ke Rb750G dan ujungnya ke Pc agan

4. Buka winbox Pda PC agan

5. klik browse ( tiga titik dikiri tombol conect) lalu akan muncul mac address. klik mac addres kemudian klick conect, selanjutnya akan loading data

Note: yang perlu diperhatikan disini winbox akan membaca ip address bawaan mikrotiknya dengan ip 192.168.88.1
6. Setelah masuk ke GUI winbox akan muncul tampilan seperti ini....
Pilih remove configuration. lalu winbox akan menghapus setingan bawaannya kemudian secara otomatis winbox restart. klik ok dan ulangi langkah conect di atas.

7. Setelah masuk winbox sperti langkah di atas, langkah berikutnya kita mulai setting ip address
Note: setting ip address disini ane analogikan
----ip adress modem : 192.168.1.1
jd ----ip addres eth1 : 192.168.1.2
------ip addres eth2 : optional ( bisa agan kasih 192.168.2.1 tergantung
selera)
klik IP>>>Addres>>>klik tanda "+" Input ip 192.168.1.2/24 kemudian arahkan ke interface eth1>>>klik apply kemudian ok.
Untuk eth2 seperti langkah di atas yang membedakan cuman interface diarahkan ke eth2.
8. Ip address selesai kemudian kita melakukan Routes pada mikrotik
klik IP>>>Routes>>>>Input Ip Modem>>>Apply>>>Ok

9. Setting DNS, Klik IP>>>.DNS>>>Setting>>>>input 202.134.1.57 dan Primary Dns 202.134.0.145

jangan lupa centang Allow Remote Request

10. Setting NAT ( Wajib Biar client bisa terkonek dengan Internet)
klik IP>>>>Firewall>>>>NAT>>>Action>>>Accept rubah jd Masquerade.


Sumber : Link

Senin, 02 Mei 2011

DUAL BOOT XP&7, PREINSTAL WINDOWS 7

Langkah2nya
  1. Biarin windows 7 keinstal di drive C gan
  2. Abiz itu lakukan clean instal Windows XP ke drive D
  3. Setelah agan melakukan langkah ke 2, boot dari windows 7 pasti ilang gan ke replace boot windows XP
  4. Kita kembliin lagi boot computer ke windows 7 gan caranya masukin DVD Windows 7 untuk boot, trus pilih repair, trus pilih, trus lagi lebih jelasnya disini
  5. Nah sekarang udah bisa masuk windows 7 lagi kan gan
  6. Download "EasyBCD" dulu gan biar bisa ubah menu boting
  7. Instal "EasyBCD" dulu gan, trus di open ya
  8. Pilih menu "Add/Remove Entries" gan           
  9. Di kolom "Add an Entry - Type" pilih "Windows NT/2k/XP/2K3", kolom "Add an Entry - Name" isi "Windows XP"                                           
  10.  Klik "Add Entry"
  11.  Klik "Save"

Thanks to : ex_lumber

    Sabtu, 05 Maret 2011

    Lupa Password Folder Security Personal 4.1

    Program Folder Security Personal adalah salah satu dari sekian banyak pelindung folder yang lumayan baik. Program itu bisa rekan-rekan http://www.y0ys.com/
    Berikut ini salah satu cara mengatasinya lupa password Folder Security Personal 4.1 :

    Untuk masuk ke konfigurasi Folder Security Personal 4.1 tanpa tahu/lupa passwordnya caranya lumayan ribet juga. Program ini kayaknya sulit di bypass proteksi password konfigurasinya dalam normal windows, sehingga kita harus keluar dari windows normal.

    Anda bisa mencoba memakai sistem operasi lain, sistem operasi dimana program yang ingin anda buka konfigurasinya tidak terinstall, bisa memakai CD Windows Xp Recovery Consol, atau mungkin pakai cara lain.

    Intinya : Install program di komputer lain. Set password sesuka anda. Dapatkan file bernama flocker.usr dan secdir.sys yang terletak di C:\windows\system32.

    Simpan dua file itu. Kemungkinan besar file flocker.usr tidak akan bisa anda lihat di normal windows karena ikut di proteksi oleh program ini. Sehingga anda butuh sistem operasi lain, atau setidaknya butuh keluar dari windows anda.

    Bila rekan2 ingin sedikit mengurangi kerepotan, rekan2 bisa langsung mendownload file yang berisi password Folder Security Personal 4.1 http://www.geocities.com/ariawaneko/Folderku/fsp_lovepassword.zip
    Ektrak file zip tersebut. Password yang kelak harus anda masukkan adalah "lovepassword" tanpa tanda kutip.

    Setelah dua file tersebut anda dapatkan, maka tugas selanjutnya adalah replace atau gantikan
    dua file lama yang passwordnya anda lupa atau tidak tahu, dengan dua file baru yang baru saja anda buat atau anda download. Karena dua file tersebut diproteksi maka anda juga mungkin sulit melakukan ini dalam normal windows karena filenya di proteksi oleh program Folder Security Personal. Anda tidak akan diijinkan menindih dua file itu. Ingat file yang harus anda tindih adalah file flocker.usr dan file secdir.sys yang terletak di c:\windows\system32

    Lakukan proses replace atau proses menimpa file ini di luar windows. Anda bisa memakai sistem operasi lain atau memakai CD Windows XP Profesional bagian Recovery Consol. Caranya mirip ketika saya membahas mengenai password DeepFreeze. http://lovepassword.blogspot.com/2008/07/mengatasi-lupa-password-deepfreeze.html

    Setelah ini anda lakukan silakan anda masuk windows lagi. Buka program Folder Security Personal, jika muncul kotak password, masukkan password anda yang baru saja anda buat. Bila anda mengambil file password milik saya , berarti passwordnya adalah lovepassword. Dengan cara itu kita bisa masuk kembali ke konfigurasinya.

    Thanks to
    Love Password

    Kamis, 24 Februari 2011

    Multiple Operating System dengan acronis

    1. Download Acronis Disk Director 11 Home Build 11.0.216
    2. OS apa yang sudah agan install ?
    -----------------------------------------------------------------------------------------------------------------------------------------------------------------------------------------------------------
    1. Misalkan belum ada OS ter-install
    2. berikut contoh harddisk 40 GB
    3. Dipartisi untuk keperluan 3 OS yaitu : xp,win 7 dan linux
         4.  C: (untuk xp), E: (untuk acronis OS selector), F: (untuk win 7), 
               Unpartitioned space 10896 MB (untuk linux)
         5.  Install xp
         6.  Install Acronis Disk Director Suite 10.0.2160
    -----------------------------------------------------------------------------------------------------------------------------------------------------------------------------------------------------------
    1. Misalkan sudah di install xp
    2. Install Acronis Disk Director Suite 10.0.2160
    3. Masalahnya untuk win 7 minimal harus ada 20 GB dan biasanya harus lebih karenakan belum diinstall program2
    4. Untuk linux 10 GB sudah cukup untuk belajar linux
    5. Buat partisi baru 40 MB untuk acronis os selector format NTFS
    6. Buat partisi baru 20 GB untuk win 7 format NTFS
    7. Buat partisi baru 10 GB untuk linux biarin aja jgn di format, nanti formatnya pas install linux
    8. Install acronis OS selector dari start>All programs>acronis>acronis disk director>install acronis OS selector 

        9.   Di install di partisi yang 40 MB
        10.  Hasilnya seperti ini gan :
         11.  Delete boot from drive A
         12. Gunakan Acronis Disk Director Suite 10.0.2160 untuk merubah partisi F menjadi
               Primary dan Aktif
        13.  install win 7
        14.  Format partisi win 7 !!! Kalau lupa bisa gagal
        15.  setelah win 7 diinstall, seharusnya MBR xp dan acronis os selector tidak 
               muncul
        16.  Tapi kalau muncul :
        17.  Agan lupa bikin partisi win 7 primary & aktif, kalau sudah begini harus ulang 
              install win 7 nya. Karena sudah diusahakan dengan easyBCD tidak bisa
        18. Gunakan Hirens.BootCD.v10.4.[LucuBRB] untuk masuk ke xp
     
         19.  Masuk Acronis os selector>activate os selector
        20.  Belum ada win 7, masuk xp
        21.   masuk explorer>tools>view :
               - show hidden files and folder
               - hide extention for known file type
               - hide protected os system file
               - apply
        22.  Ke partisi scronis os selector
        23.  cari file bootwiz.oss, edit pakai notapad
        24.  cari :
                         <oses>
                         ....
                         </oses>
        25.  tambahin :
                         <oses>
                         ....
     
                        </oses>
        26.  Hasilnya :
        27.  Install linux, hasilnya :


    50$ USD paid per read emails

    50$ USD paid per read emails

    Selasa, 22 Februari 2011

    Analisis Blue Screen Of Death dengan BlueScreenView v1.31

    Description

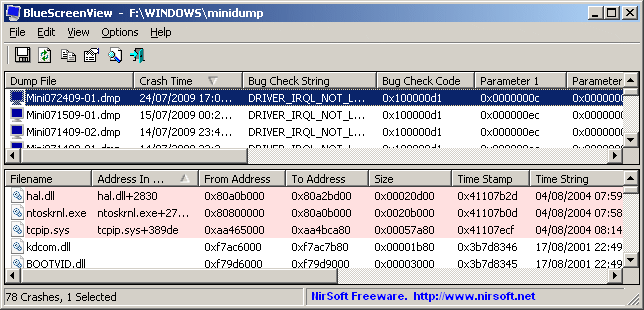
    BlueScreenView scans all your minidump files created during 'blue screen of death' crashes, and displays the information about all crashes in one table. For each crash, BlueScreenView displays the minidump filename, the date/time of the crash, the basic crash information displayed in the blue screen (Bug Check Code and 4 parameters), and the details of the driver or module that possibly caused the crash (filename, product name, file description, and file version).
    For each crash displayed in the upper pane, you can view the details of the device drivers loaded during the crash in the lower pane. BlueScreenView also mark the drivers that their addresses found in the crash stack, so you can easily locate the suspected drivers that possibly caused the crash. 

    Versions History

    • Version 1.31:
      • Added 'Google Search - Bug Check+Driver' for searching in Google the driver name and bug check code of the selected blue screen.
    • Version 1.30:
      • Added 'Dump File Size' column.
    • Version 1.29:
      • You can now send the list of blue screen crashes to stdout by specifying an empty filename ("") in the command-line of all save parameters.
        For example: bluescreenview.exe /stab "" > c:\temp\blue_screens.txt
    • Version 1.28:
      • Added 'Add Header Line To CSV/Tab-Delimited File' option. When this option is turned on, the column names are added as the first line when you export to csv or tab-delimited file.
    • Version 1.27:
      • Fixed issue: removed the wrong encoding from the xml string, which caused problems to some xml viewers.
    • Version 1.26:
      • Fixed 'DumpChk' mode to work properly when DumpChk processing takes more than a few seconds.
    • Version 1.25:
      • Added 'DumpChk' mode, which displays the output of Microsoft DumpChk utility (DumpChk.exe). You can set the right path and parameters of DumpChk in 'Advanced Options' window. By default, BlueScreenView tries to run DumpChk from '%programfiles%\Debugging Tools for Windows'
      • The default MiniDump folder is now taken from HKEY_LOCAL_MACHINE\SYSTEM\CurrentControlSet\Control\CrashControl
    • Version 1.20:
      • Added 3 new columns in the upper pane: Processors Count, Major Version, Minor Version.
      • Added 'Explorer Copy' option, which allows you to copy dump files to the clipboard and then paste them into Explorer window.
    • Version 1.15:
      • Added option to view the blue screen list of multiple computers on your network. The computer names are specified in a simple text file. (See below).
      • Added Combo-Box to easily choose the MiniDump folders available in the hard-disks currently attached to your computer.
      • Added 'Computer Name' and 'Full Path' columns.
    • Version 1.11:
      • Added /sort command-line option.
    • Version 1.10:
      • Added accelerator keys for allowing you to toggle between modes more easily.
      • Added command-line options for saving the crash dumps list to text/csv/html/xml file.
      • Added command-line option for opening BlueScreenView with the desired MiniDump folder.
      • Fixed focus problems when opening the 'Advanced Options' window.
      • Added 'default' button to the 'Advanced Options' window.
      • Added 'processor' column - 32-bit or x64.
    • Version 1.05 - Added support for x64 MiniDump files.
    • Version 1.00 - First release.

    BlueScreenView Features

    • Automatically scans your current minidump folder and displays the list of all crash dumps, including crash dump date/time and crash details.
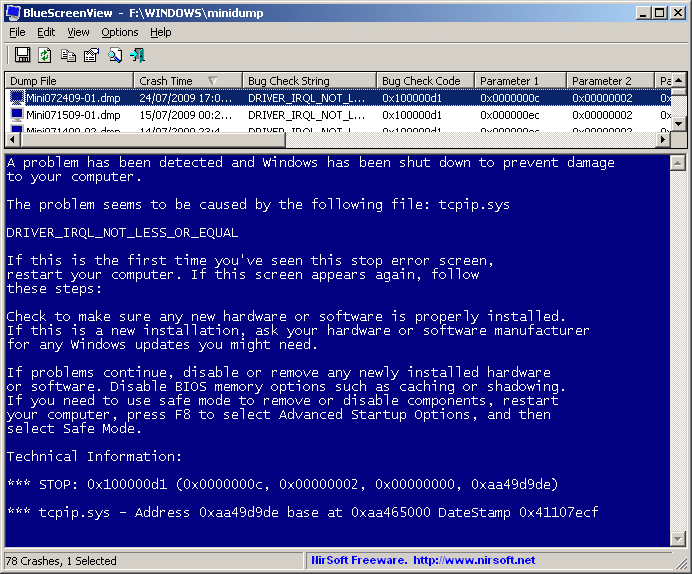
    • Allows you to view a blue screen which is very similar to the one that Windows displayed during the crash.
    • BlueScreenView enumerates the memory addresses inside the stack of the crash, and find all drivers/modules that might be involved in the crash.
    • BlueScreenView also allows you to work with another instance of Windows, simply by choosing the right minidump folder (In Advanced Options).
    • BlueScreenView automatically locate the drivers appeared in the crash dump, and extract their version resource information, including product name, file version, company, and file description.

    System Requirements

    • BlueScreenView works with Windows XP, Windows Server 2003, Windows Server 2008, Windows Vista, and Windows 7, as long as Windows is configured to save minidump files during BSOD crashes. If your system doesn't create MiniDump files on a blue screen crash, try to configure it according to the followinf article: How to configure Windows to create MiniDump files on BSOD
    • BlueScreenView can read the MiniDump files of both 32-bit and x64 systems.

    License

    This utility is released as freeware. You are allowed to freely distribute this utility via floppy disk, CD-ROM, Internet, or in any other way, as long as you don't charge anything for this. If you distribute this utility, you must include all files in the distribution package, without any modification !

    Download Bluesreenview (In zip file)

    download  Bluesreenview with full install/uninstall support


    Copyright (c) 2009 - 2011 Nir Sofer

    Senin, 21 Februari 2011

    Add Ons Phzilla, membypass usaha blokir Telkom

    Bagi anda anda semua yang kesulitan membuka suatu situs yang diblokir sama provider telkom, seperti dibawah ini???

    jangan kuatir banyak jalan menuju roma
    1. perhatian cara ini hanya pengguna browser Mozilla firefox  download  https://addons.mozilla.org/id/firefox/addon/phzilla/
    2. Install add ons Phzilla pada firefox
    3. Buka situs yang diblokir ama Telkom
    4. Klik ikon phzilla di taskbar mozilla  
    Silahkan berselancar